The solution to get your website online
Create WordPress website
To take your projects to the Internet you need to use tools that facilitate the start-up and subsequent content management.
Creating a website in WordPress is a very popular solution that gives you the possibility to start any website without any programming or layout knowledge using HTML tagging language.

Get ready because the journey to create a page with WordPress starts here!
In this guide we will delve into this fascinating world to learn how to make a WordPress website.
Table of Contents
1. How to contract Hosting for a WordPress web site
2. Choose a domain
3. Install WordPress on your Hosting
4. Get to know the WordPress dashboard structure
5. Configuring a WordPress website
6. Install and configure the theme of your WordPress website.
7. WordPress posts
8. Pages in WordPress
9. Managing comments on a WordPress website
Contract Hosting for a WordPress web site
There are good sites with a cost adjusted to the service you receive, and there are sites or cheap places where the “low cost” is present even in the service you receive, but you only discover that once you are inside.
Analyze well the following aspects to choose your hosting provider:
- What kind of WordPress Hosting offers you (plans).
- What is the elasticity that your Hosting can adopt according to the requirements of your website.
- 24/7/365 Support available for Hosting in general.
- Professional WordPress support in a specific way.
- Return Policy.
- Backup Management.
- Security measures at Services, Hosting and CMS level.
- Other added values that are focused on improving the service you hire.
With these points you should be able to evaluate and build a list of possible Hosting WordPress providers for your web projects and choose the one that best meets your expectations.
Mini Plan
1,18$USD/month
1 free domain for the first year
2 websites
11 GB space on SSD Disks
50.000 visits/month
The best technical support 24/7
WordPress support in forum
No consumption limit
Free website migration
All technical characteristics
Medium Plan
4,75$USD/month
1 free domain for the first year
No website limit
22 GB space on SSD Disks
150.000 visits/month
The best technical support 24/7
WordPress support in forum
No consumption limit
Free website migration
All technical characteristics
Maxi Plan
7,15$USD/month
1 free domain for the first year
No website limit
44 GB space on SSD Disks
500.000 visits/month
The best technical support 24/7
WordPress support in forum
No consumption limit
Free website migration
All technical characteristics
The monthly price is calculated based on the annual payment price. All prices shown without VAT.
Your brand on the internet
Choose a Domain that represents your site
There are some aspects that you should always consider before buying a domain name:
- Check if the domain you are going to use is free, related to a trademark or already registered. Check in WIPO.
- What will be the scope of your web project (local, regional, national or international).
- Define a domain name that identifies the project you are going to manage.
- Avoid special characters, accented words, compound words separated by hyphens, as this will force you to use domains converted to IDN, which will cause you a lot of headaches from the beginning.
- The TLD should be according to the type of project (.es for a project with scope only in Spain, .com if it is going to be an international or ecommerce project, .org if you are going to focus on an organization and so on).
- Try to emphasize the brand that the domain will represent.
- Consider integrating (if possible) the main keyword of your project in the domain.
Choose well, with tranquility and opt as far as possible for domains with short and easy to remember name, your future users will appreciate it.
Next, let’s see how to install WordPress on a Hosting.
Free migration
Easily install WordPress on your Hosting
The manual installation of WordPress is one of the usual methods of installation, since from a packaged .zip file downloaded from WordPress.org you can get a clean installation to which you can later add a free or commercial theme and the necessary plugins to create WordPress.
- Download the latest stable version from WordPress.org
- Avoid creating the /wordpress folder by unzipping the zip file on your computer.
- Inside the unzipped folder on your computer named /wordpress select everything and compress it into a zip file.
- Upload the compressed .zip file to your Hosting to the folder where you are going to create a website with WordPress.
- Extract the .zip file on the Hosting with the “Extract” tool.
- In the Databases section, create a Database.
- Assign privileges to the user of the database so that he/she can use it.
After these steps you have successfully completed the manual installation of WordPress.
Now you are ready to access the WordPress administration panel, called dashboard, and familiarize yourself with its structure before you start creating content.
- In your browser load the url of the domain (or the temporary url) to install WordPress.
- Follow the installation process as described in the video (below).
- Once the installation is finished, check that the WordPress .htaccess file is correct.
- Check the basic settings from Settings, General.
- Check that you can access WordPress, specifically the dashboard from your domain.
After these steps you have successfully completed the manual installation of WordPress..
You are now ready to access the WordPress administration panel, called dashboard, and familiarize yourself with its structure before you start creating content.
Inside
Get to know the WordPress dashboard structure
The main part of the dashboard home page is composed of widgets, which are nothing more than blocks distributed on the screen that present internal information, coming from plugins or functions and also external information coming from feeds or information channels.
By default, it is composed of the following sections or blocks:
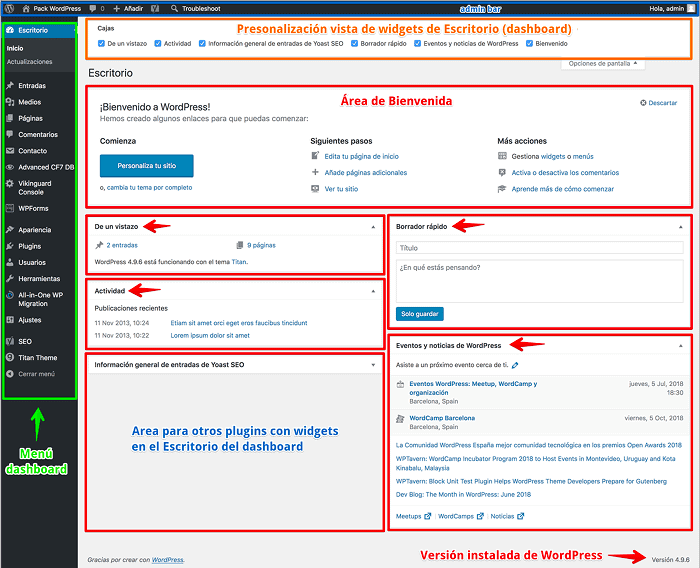
Welcome
At a glance
In a simple info line it shows you the version of WordPress installed and the name of the Theme your WordPress uses.
Activity
Quick Draft
Let’s say it is rather intended for microblogging.
WordPress News and Events
It also includes links to the latest articles published on the WordPress.org Blog.
Admin bar
If it is not disabled in “My Profile” WordPress User, this bar will also be visible on the front end of the website, both for the administrator and for users with lower access levels, also called roles.
This bar displays contextual information depending on the role of the logged in user.
In the administration bar, on the right is shown the avatar of the user connected to the dashboard and when deployed it is possible to see the shortcuts to the Profile and the option to “Logout” or Logout, which will disconnect us from the WordPress dashboard.
Dashboard options tabs
In the “Help” tab, when expanded, links to documentation about the dashboard and the official WordPress Forum are displayed.
Sub-tabs are also displayed on the right side of this help with information specific to other sections of the dashboard.
Side menu bar
From the management of Entry, Pages, Comments or multimedia content, through the Customization of the theme and other global settings of the installation.
In addition, the access to plugins installed after the initial installation of WordPress will be shown, being able to display second and third level menus to access specific functions of some of the installed plugins.
Depending on the user role with which /wp-admin or /wp-login.php is accessed, the left menu of the WordPress dashboard will present more or less items that the corresponding user will be able to access to manage the website.
An Administrator user will see all the menus of any level and other functionalities available in the dashboard, as long as they have not been disabled with a plugin specifically designed for it; while a user with the role of Subscriber (normal registered user) will only see in this menu the accesses to his Profile to configure it or modify data and some other option that the administrator has been able to enable through a plugin for managing profiles or specific roles.
The menu bar in desktop installations shows at the bottom left the “Close menu” option to expand or collapse the menu, i.e. iconify it and thus free up horizontal space on the screen.
Footer
In detail, this is the WordPress dashboard, or administration panel, which allows you to have an overview of the installation, with statistical data provided by some plugins and other information about WordPress and the website you are managing.
UNDERSTAND IT EASY
Basic configurations of a WordPress website before getting started
The theme is not only the visual identity of your project, your brand or e-commerce store, it is also the part of your installation to which you will probably dedicate more hours, both in terms of customization and in terms of content structure.
Among the many WordPress templates, choose a theme that you can master with some ease, that is not overloaded with features that you may not need later and above all, that is lightweight and favors the positioning of your content.
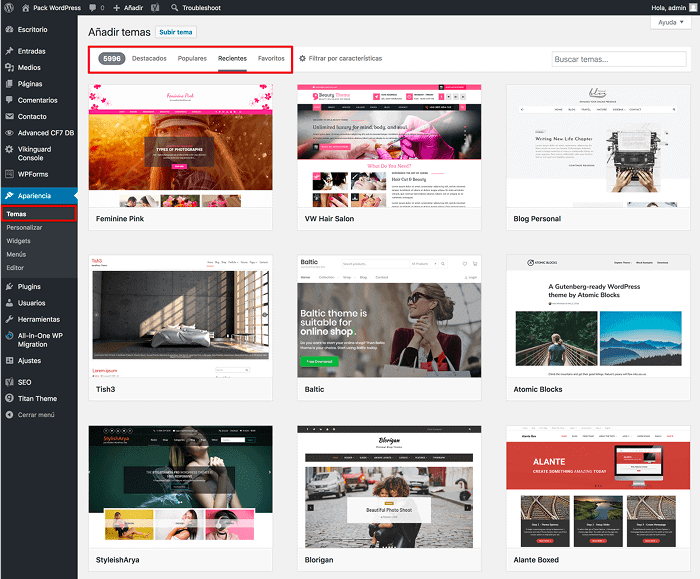
If your budget is very tight, remember that in the WordPress dashboard, Appearance, Themes, Add new, you can discover hundreds of free or “freemium” themes, more than 5000, that you can use in your web project without having to invest an amount of money to use it. In addition to being able to install a template in WordPress easily.
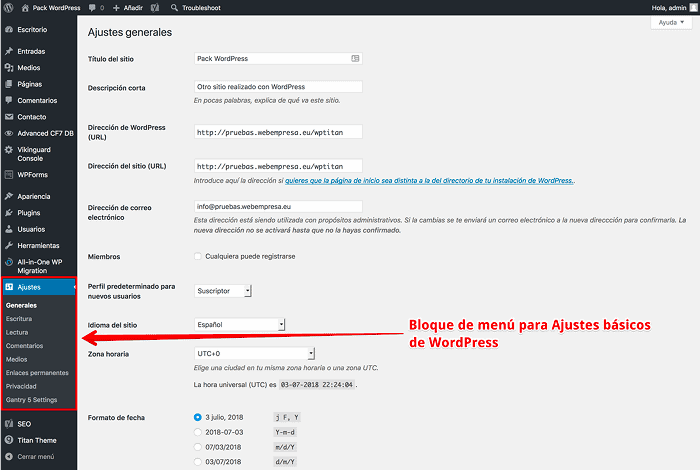
The sections of the basic configuration needed in WordPress are as follows:
- General
- Writing
- Reading
- Comments
- Media
- Permanent Links
- Privacy
In the end, if you don’t check these settings after installing WordPress, it is possible that some time later you will have problems for example with the urls that Google and other search engines have indexed, if for example you didn’t enable more friendly urls in Permalinks, or that you won’t receive notification emails from the dashboard if you didn’t change the default email in the General settings.
SHAPE YOUR WORDPRESS
Install and configure your site’s theme
These settings are applied in the dashboard, from Settings, General, where you can configure aspects such as:
- WordPress title and WordPress meta description of the site (although with SEO plugins like Yoast SEO you will do better).
- The URL with which your site will load (with or without www alias).
- The dashboard notification email.
- Geolocation, time zone and WordPress language.
- What to display by default on the front page of your website.
- Visibility control for indexing bots.
- Comment settings and blacklists of banned words.
- Behavior of images in the Media Library.
- WordPress permalinks configuration (important for SEO).
- RGPD WordPress management (Privacy Policy basically).
It is possible that depending on the theme you use there may be other settings sections in this section of the dashboard. Do you already have a theme chosen or purchased? …let’s see how to install it.
Install and configure your site theme
Always, before installing a WordPress Theme it is advisable, for your peace of mind later in case of problems, to make a backup, as there could be a small problem in the installation of the theme and having a WordPress backup helps to go back quickly and easily.
Once you’ve backed up WordPress and have it safe, it’s time to access the dashboard, go to Appearance, Themes and click where it says Add New.
This displays a view of the top themes available on WordPress.org, which are generally free or released in “freemium” format..
Browse through the available theme pages and click Details and preview the theme that catches your eye until you find the one you want.
Have you found it? perfect, let’s install it.
- Locate the desired free theme.
- Click Install.
- Click Activate to start using it.
- Now you will see the Customize button, click it to start customizing the theme.
The installation of free themes can also be done by using .zip files with themes you have downloaded from reliable sources on the Internet and installing them from the dashboard or uploading them via FTP, although the most recommended method is the one explained in steps.
Installing a WordPress Business Theme
Premium WordPress Themes are usually quite demanded for projects and preferred by marketers and implementers of sites with this CMS.
There are many sites on the Internet where you can buy professional themes, with a high level of visual development, SEO improvements to position the content well and also 100% adaptable to any type of device.
Commercial themes, as a general rule, when downloaded from the developer’s website usually go in zip files that you must first unzip on your computer before proceeding to install it, as they usually introduce within the main zip other files, including the .zip file of the theme that you have to install and others such as the license to use the theme.
The installation of a Commercial Theme is summarized as follows:
1. Login to the WordPress dashboard.
2. Make a backup copy.
3. Go to Appearance, Themes.
If you have the theme to install on your computer, unzip it and check if there is another .zip file (of the Theme) inside.
From the dashboard, click on “Add new”.
Click on “Install now”.
As you can see, the installation of a Commercial Theme previously downloaded to your computer does not differ much from the installation of a free theme.
From here you have a big job ahead that basically consists of configuring the theme with the identity of your website (your project), customize the design, colors, menus, widget, etc..
In WordPress Themes are usually located in the /wp-content/themes/ folder and inside this folder there can be as many subfolders of themes as you have installed, whether they are active or not.
UNINSTALL THEMES EASILY
Remove installed WordPress themes
This removal process should be quick, something that could be solved with a simple click, but no, the developers, who must be short on UX, thought to put it in a hidden place, as you will see below.
What ways do you have to uninstall WordPress themes?
- From the dashboard, Appearance, Themes, Delete.
- Via FTP, accessing the /themes folder.
- From the File Manager of your Hosting Panel.
- Via SSH, executing a command through the WP-CLI interface.
Basically these are the common or usual methods, although it is the first one that is intended for normal users who in normal situations should also be able to use it to remove unused installed themes.
El proceso referido lo puedes ver a continuación mejor explicado por pasos:
1. Accede al dashboard de WordPress.
2. Realiza una copia de seguridad ¡nunca se sabe!
3. Ve a Apariencia, Temas.
4. Al pasar el ratón por encima del tema a eliminar verás “Detalles del Tema”, haz clic.
5. En la parte inferior derecha aparecerá el botón Borrar.
6. Clic para eliminar permanentemente el tema instalado.
Para poder desinstalar un tema, este tiene que estar desactivado, de lo contrario no será posible su eliminación.
En el siguiente vídeo se ilustran los 3 métodos comentados para que sepas como eliminar temas instalados que no necesitas y que ocupan espacio en tu Hosting.
Posts in WordPress
In WordPress there are 2 different types of content, although similar in structure, that you can create:
- Entries (or Post)
- Pages
With WordPress Posts you can create contents that are generally published in your WordPress Blog, unless your site is designed as a Review, magazine or Newspaper, for example, and they are published associated to WordPress Categories and Tags, so that the content is classified in a structured way and according to keywords or grouping of content by previously defined categories.
It is important to understand that in WordPress it is not enough to simply publish an Entry and then, some time later, remember to associate it to a WordPress Category that identifies it or add tags, because your SEO will be affected and your publications will be more difficult to classify them, mainly by the bots or indexing robots.
This association of content grouped by words that define them and facilitate their location is commonly called Taxonomies in WordPress.
It is useful for this section dedicated to WordPress Posts to understand that through taxonomies, mainly Categories and Tags, you can group related content so that they can then be located in a more grouped and specific way.
Knowing that the ideal is to have Categories created to then add Entries, let’s see how to generate content in WordPress for a Post or Entry.
Within the first level menu “Posts” you will see the following second level menus:
- All Entries: where you get an overview of all created Entries, published or not.
- Add new: to create new Entries or Posts.
- Categories: Where you create, modify or delete Categories.
- Tags: Where you create, modify and delete Tags.
Both Categories and Tags are something that you should always create before you start adding new content to your website, and as far as possible do not go around changing the category structure too much because that will affect the positioning of the indexed content.
Define a structure of those Categories that you are really going to use and to refine the content filtering it is better to use Tags.
Better a structure of 5 or 10 general Categories and the rest managed by Tags than 20 or 30 Categories, many of them empty or with one or 2 entries per Category, which would impoverish your content structure.
To create an Entry go to the Entries menu and click or tap on “Add new”.
You will see the Input box with relevant fields such as:
- Title
- Body text block.
- Widget “Publish” where you manage:
- The status of the publication (draft or pending review).
- The Visibility of the publication (Public, Password protected or Private).
- Publish “immediately” or schedule date and time of publication.
- On-page SEO options if you use specific plugins.
- Categories: Select within existing or create new Categories.
- Tags: Select by searching for existing tags or create new ones.
- WordPress featured image: If your theme handles featured images for Posts you upload them here (Not all themes support featured image).
- SEO options (if you use specific plugins).
- WordPress Slug: Format of the title snippet that identifies the Post when search engines index it.
The process of creating an Entry explained in video would be the following:
You have seen that the creation of Posts in WordPress is an extremely simple process, where it is very important to consider aspects prior to the creation of content and during this process never forget the on-page SEO, necessary to position your publications well.
WordPress Pages
However with the advent of builders or builders to WordPress, many Pages have become real landings or landing pages rebuilt with WordPress visual editors such as Page Builder, Elementor or others, allowing a constant improvement and adaptation of content more dynamically.
There are some basic and very necessary pages that you should never forget to create on your website:
- Privacy Policy.
- WordPress Cookie Policy.
- Legal Notices.
- Thank You Page (WordPress Thank You Page).
- Contact Us.
- About (the famous About Us).
- The Home Page, which is still a Page.
- Depending on the focus of your website you can have more pages with static or little changing content, but you should always have these pages in any website you manage.
How to create a Page in WordPress?
It is a very simple process, which does not require previous processes since it does not depend on taxonomies, you know, Categories or Tags.
- Go to Pages (dashboard, left menu).
- Click on “Add new”.
- Fill in the required fields (title, body text).
- Add a featured image if applicable.
- Set the keyword if you use an SEO plugin.
- If it is for immediate publication click on Publish
- Link the page to a Menu in WordPress from Appearance, Menus.
- Check the Page loading from the front end.
The process of creating a Page explained in video would be as follows:
Pages are important, they also position, and many users land directly on it coming from Internet searches, take care of them, do on-page SEO to enhance them, give them life, color, put images or graphics, also videos, anything goes if it enriches and contributes.

Manage comments on your publications
Thanks to WordPress comments, visitors to your website can give their opinion on the content they consume.
Through these they can add contributions on the topic covered in the post, ask questions, and provide feedback giving option to the community interaction around the content.
WordPress natively has its own comment management system that can be displayed on pages and posts.
All WordPress themes are designed to handle comments, however, it’s up to you to know how to engage users who visit your site and encourage them to leave comments.
Comments made through the native WordPress system are displayed on the comments page in the WordPress administration area (dashboard).
If you hover the mouse pointer over a comment the action links for the comment are displayed.

With comment moderation you can prevent abuse by malicious users, or SPAM being posted on WordPress within your website using the form.
When using comment moderation it is useful to implement additional spam protection using the Akismet plugin, as a way to significantly reduce the chances of any spam comments getting published.
Meet the Media Library
It is the big store where all the media files you use on your website are stored.
From Media you can manage image files, audio, video, PDF’s, mp3, etc., and use them in Posts and Pages from the native WordPress functionalities.
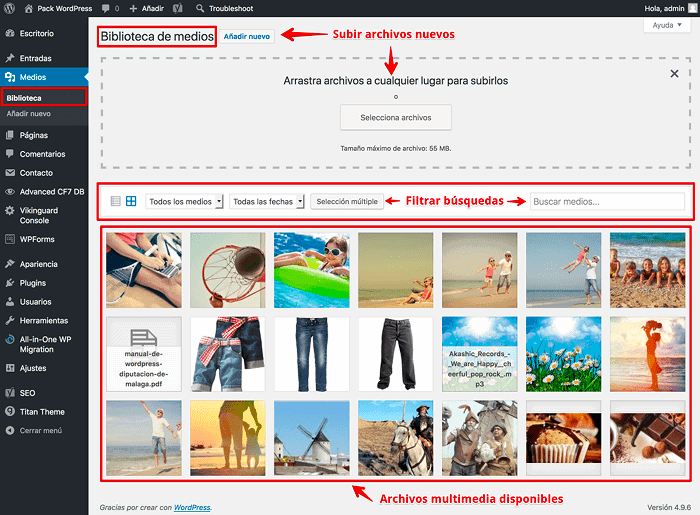
- Upload multimedia files with allowed MIME formats.
- Modify some aspects of the images.
- Check which page the files are associated to.
- Permanently delete hosted media files.
- Delete orphaned files not associated with publications.
- Obtain weight and dimension data for images (individually).
- Execute batch actions for one or multiple files in the library.
In order for WordPress not to interpret the images you upload and generate additional sizes with each new image, you must set in Settings, Media default sizes to zero.
Learn how to create and configure Menus
They are a fundamental part of the page to direct the visitors towards the contents, being able to show information of first level, second or other levels of depth in the web, depending on the structure of the site.
The first level menus are the most common in any website you visit daily, where you start with a “Home” and possibly end with a “Contact” and depending on the theme used by the website, are menus that are displayed horizontally and on mobile devices become the classic “hamburger menu”.
Needless to say that a menu should contain access to all those sections of first level of your website, and that are usually located in the Main Menu and the sections of second and third level should be displayed either in drop-downs of the main menu or as second-level menus, or contextual, of the area of the web where it is required.
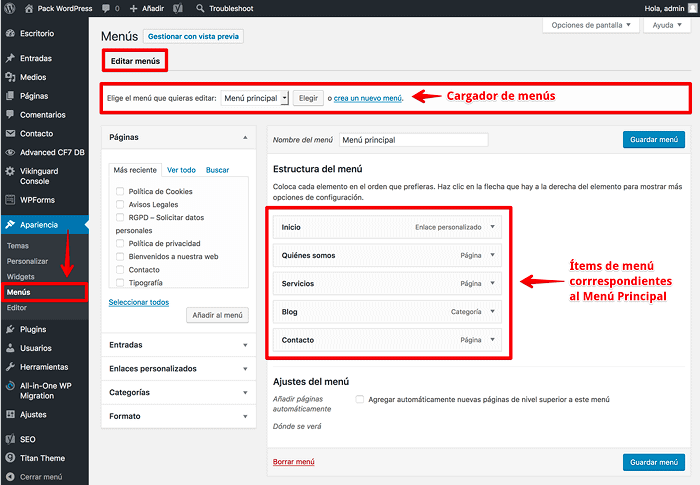

Knowing that menus are necessary to facilitate navigation, we can go to the next level and create menus and display them on the site.
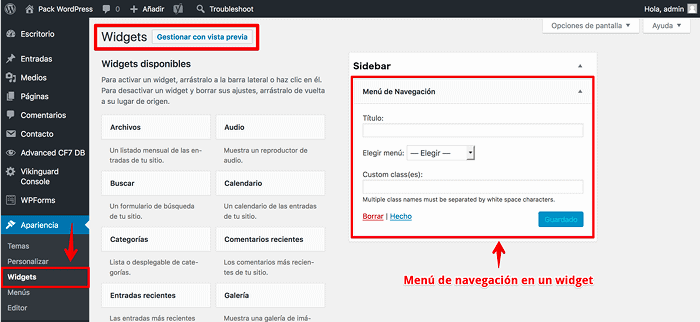
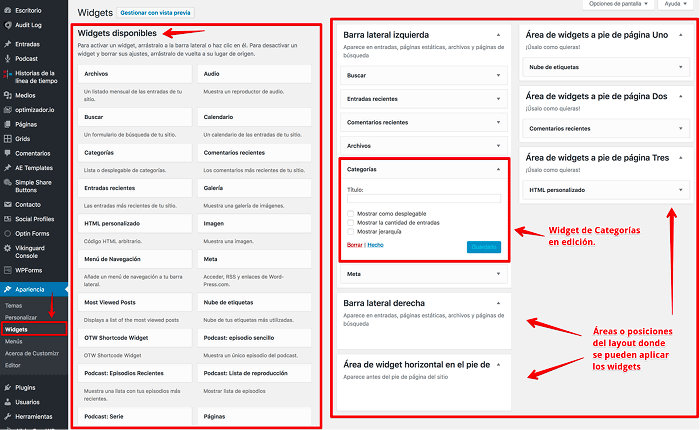
Widgets, what are they and how to use them?
From Appearance, Widgets it is possible to have control of all of them and display them in different areas of the layout.
How to create a widget?
- Access the WordPress dashboard.
- Go to Appearance and then to Widgets.
- From the available widgets on the left drag one to the place where you want to place it in a widget area on the right.
- Make the necessary changes or customizations to the widget settings.
- Click Save.
- View the changes on the front end of the website.
As a general rule, widgets are displayed in most themes in the right or left side area, depending on the layout design, and additionally in the footer, although many themes already include content in widgets that can be customized from a WordPress framework or a builder (builder).
Widgets can include from a menu, to code from a “Weather” script, images, banners, audio players and an endless number of highly customizable contents.
Installing Plugins
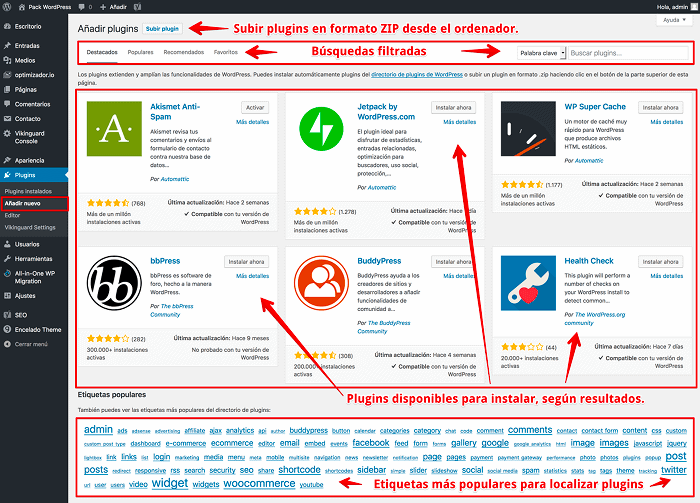
Many of the features added by plugins can be implemented in WordPress directly in files such as functions.php of the active theme and thus avoid the massive installation of external plugins.
It is true that the democratization offered to users by plugins makes it possible to add almost all the imagined functionalities to WordPress in very few clicks and quite safely.
There are plugins for almost everything you can imagine, some to add functionality to the dashboard, others to improve content management, to secure the web installation, to offer rooms through reservations, to download files from a private area, and a long etcetera that could not be mentioned in this guide.
This simplicity causes many users to be attracted by the ease with which they can be installed and end up overcrowding the website with plugins that will probably not end up being used, slowing down the site and over time leaving it vulnerable if the installed plugins are not kept up to date, even if they are not used.
Change Theme securely
This leads to look for new Themes until finding another one that meets the needs of the project, having clear that a change of theme implies many modifications, not only visual or aesthetic but also relocation of the content blocks.
It is for this reason that it is always recommended to invest more time in analyzing in detail the candidate Themes and evaluate not only the visual part, but also the functionalities, availability of widgets in certain areas of the layout, that it is adaptable to any device and that it complies in the best possible way with W3C standards.
What motivates a change of Theme?
- The use of poorly developed themes or templates with shortcomings.
- That it is not adaptive (Responsive Web Design) to devices.
- That it is not designed for SEO.
- That it includes many “lock-in” elements that tie up the contents.
- That the most important plugins of the web do not get along well with the theme.
- That the theme has been abandoned by its author and does not receive updates.
- That your project, company or brand changes direction or image.
If you have already decided that you want to change your WordPress theme and you have already gone through the selection process and even downloaded it to your computer, it’s time to see how to do it.
Steps to change WordPress Theme:
- Access your website dashboard.
- Make a backup (files and database).
- Save the widgets that you will continue to use (move them to Inactive Widgets).
- Go to Appearance, Themes.
- Click Add new.
- Click Upload Theme.
- Select the Theme in zip format on your computer.[1]
- Click “Upload” to install it.
- Click Activate once the upload and installation is complete.
- Go to Appearance, Themes and click Customize from the activated theme.
- CConfigure the new theme with the general site information.
- Activate the menu again, in case it is not initially visible.
- From the Customizer, Widgets, activate the widgets that you “inactivated” in the desired positions.
- Configure the rest of the Theme elements to your liking.
- Remove the plugins that you do not use, associated with the previous theme.
- Delete the previous Theme if you don’t need it.
- Check that the website loads with the new theme.
- Verify from mobile devices that the web looks responsive.
- Check the loading times of your website with the new Theme.
If everything went well you should have your new theme working, replacing the old one.
[1] When you download a purchased (commercial) Theme it is possible that the author gives you a ZIP packaged file with other files inside. You must previously unzip it on your computer and make sure that there is no other zip file inside. If there is, then it will be that internal ZIP file that you will have to select to install.
On-page SEO fundamental for positioning
For any project that uses WordPress as a content management system, issues such as SEO on-page and usability have to be on par with the content, without forgetting that Google cares a lot about these aspects.
Writing posts without thinking about SEO “is like putting on a basted suit or dress, sooner or later it will start to unravel”, and then it will take its toll on your website, and the workload to correct it later will be greater than if you build the contents thinking about positioning them better.
Some points to keep in mind to improve on-page SEO:
- Only the title should be inside an H1 tag (make sure any headers or subheaders use H2, H3, H4).
- Use the keyword in the URL “if possible”, but above all, make the URL human friendly (don’t just think about indexing bots).
- The Title of your post should contain the keyword, the more to the left the better, but with meaning.
- Avoid that the Title exceeds 60 characters so that in the indexing process it is not truncated, breaking the sense of the title.
- The meta description is intended to inform the reader why to read your post, use it wisely! and no longer than 250 characters.
- If your page or post has a specific subject, make sure that the keyword is used at least once in the first 75 to 100 words.
- Don’t write for the search engines, write for the readers.
- Use synonyms so as not to be repetitive in the use of keywords, Google doesn’t like it either. Avoid keyword stuffing.
- The urls of your website must be friendly. Set them to “Permanent Links”.
- Add an appropriate meta description to each page and post that differs from the overall description of the website.
- Try to make the first link to a content of your site to give it more strength.
- Add outbound links to relevant sources or references (links to authority sites).
- Always use optimized images. The optimizer.io plugin does this for you for FREE.
- Use bold and italics to emphasize texts, search engines understand this markup as more important.
- Make sure your images always contain information in the alt and title tags.
- The title of the image does not have to be the title of the page. Don’t repeat yourself for convenience.
- Don’t get too complicated with the Rich Snippet (author), Google doesn’t care either.
- Do not use content published on other websites. Google is not stupid and will penalize you, besides being unethical.
- If you use content from other authors, declare their authorship, they will thank you and you will be more honest.
- The publication date show it, Google cares (others will tell you to hide it).
- Semantic optimization is complex, hire professionals to help you, you will be more relaxed.
- Do not confuse layout with optimization, separate concepts.
- Avoid duplicate content, address your domains correctly.
- Without a sitemap in WordPress you are lost, who is going to find you, the indexing ‘bots’ certainly not.
- PageSpeed is not “the Bible”, it is just an indicator that helps you see the problem and optimize WordPress. Use it sparingly, don’t get obsessed.
- Where you do not reach with on-page SEO there will always be a professional who can get there for you.
- Spend time developing content that your readers and search engines will like! if you want to appear more.
WordPressvisitor tracking with Analytics
These metrics are obtained thanks to the SEO optimization that website owners perform so that search engines index the content based on guidelines that then help to obtain values that are graphically represented in Google Analytics.
With Analytics we can know the sources of traffic we receive on the website, countries from which they visit us, devices with which they access our website and a lot of other data that well exploited help to build real marketing strategies to convert.
- Number of users visiting your site (hour, day, week or month).
- Number of unique visits received.
- Number of sessions with date range.
- Average number of pages viewed by unique users.
- Percentage of abandonment (users who have left your site from the home page without interacting).
- Average time spent on the site.
- New users visiting your site.
- Countries from which they visit the site.
- Browser and other technologies used to visit your site.
To cite a few, but the list could be much longer and with very interesting statistical data to draw up strategies.
Although it is recommended to configure the UA-XXXXXXXX code (the one you have assigned in Google Analytics) in the SEO Yoast plugin if you have it installed in your WordPress.
Monitoring visits, and other statistical data of your website with external tools such as Google Analytics, not only contribute to lighten your web installation, but also offer you more data than you can get with tools from your Hosting Panel as Webalizer, etc..
WordPress Security is important
What are the factors that make your website insecure?
- Using an outdated and vulnerable version of the CMS.
- Installing plugins indiscriminately and then forgetting about them.
- Overprotecting your website with too many security plugins.
- Not making regular backups, apart from those made by the hosting provider.
- Using unreliable plugins, incompatible with your current version of WordPress or abandoned.
- Accessing your dashboard from insecure connections (public wifis, bars, etc) without protection.
- Not using second factor authorization (2FA) for dashboard access.
Vulnerabilities exist, that is unquestionable, so having prevention and containment policies against security flaws of a website should be part of your WordPress checklist, especially if your focus is commercial and you manage a site with a lot of visibility.
This is why we propose a Security Checklist for your WordPress installations so that you can fortify them.
- Keep the WordPress core always updated to the stable version.
- Keep your plugins updated and maintain compatibility with WordPress and PHP.
- Keep the Theme always up to date and work with child themes if you are going to customize it.
- Avoid directory scanning. Possibly your server already applies it.
- Protect the wp-admin directory from scanning.
- Protect the wp-config.php file.
- On sites with multiple users, force the change of passwords on a regular basis.
- Disable the loading of the .htaccess file from the browser.
- Use strong, non-predictable passwords. Use keychain.io.
- Disable remote procedure calls via XML-RPC.
- Disable Trackbacks and Pingbacks if you don’t need them.
- Avoid or remove the admin user admin.
- Regularly remove inactive registered users.
- Use the contributor profile for guest authors (MPE rule = Minimum Exposure Point).
- Perform regular backups.
- Remove unneeded Themes and Plugins.
- Hide PHP errors so as not to give clues to possible problems.
- Use SSL Certificates in WordPress.
- Keep track of changes made by different administrators.
- Use second factor authorization (2FA).
- Always access the web securely with a VPN.
- Do not use security plugins, delegate the hardening to a good Hosting.
For example you can disable XML-RPC in your WordPress by adding the following code to the .htaccess file of your installation:
# Disable XMLRPC in WordPressorder deny,allow deny from all allow from (IP del Hosting)
On-demand and automaticbackups
Have you ever thought what it takes in time and money every time you have to restore a website to a previous state because of a screw up, an update that has come to screw up your theme or conflict with other plugins – a disaster!
There are numerous backup plugins in WordPress, and possibly you are already using some of the usual ones, but if you still do not have it clear and your website does not exceed 512 MB, we recommend using the plugin All In One WP Migration, which besides being free, and being translated by Webempresa, allows you to make backups in less than 1 minute or 2 depending on the number of images you store on the web.
Like many plugins on the market, “All In One WP Migration” has PRO (paid) plans to expand the functionality, although the FREE version is enough for most users who just need to have downloadable backups on demand.
That you have to make backups is something that at this point is more than clear, it is important and very necessary if you want to have points of restoration of your website that allow you to return to a previous time where everything worked better.
If you also plan to perform this process many times a day, every week or month, it should be a simple and friendly process, right?
Well, what are you waiting for to give All In One WP Migration a chance to take care of your backups? more than 1 million users already have it working on their websites, only you are missing!
Are you one of those who make backups regularly or do you leave everything to free will and only remember them when it rains, snows or hails with special force. It is also applied, in a metaphorical sense, to complicated situations).
Keep in mind that most hosting providers perform backups on a scheduled basis, either daily, weekly or monthly in all or some of these modalities, allowing users to restore websites to a specific point (the date of the available copy) in case of problems in the Hosting.
Are you one of those who make backups regularly or do you leave everything to free will and only remember them when there are heavy downpours?
- Log in to your Hosting Panel (WePanel).
- Go to the section Files, Backups.
- In the section “Full backup” click on Download a full backup of the website.
- In the option “Backup destination” leave the default option Home Directory.
- Under “Email address” put your email address to be notified.
- You can also choose not to be notified.
- Click on Generate backup.
When the process starts you will see a notification as Backup Complete in Progress… and if you checked to be notified you will receive an email when the backup is finished.
WePanel backups are stored in the /home/user folder (user being the username of your hosting account) which is a folder before /public_html where your websites are stored.
This backup method is highly recommended when there are backup problems with WordPress plugins created for this purpose or the hosting space is insufficient for backups by other procedures, if your hosting allows the “overquota” temporarily.
Updates of themes, plugins and the WordPress core
WordPress has a system of plugins that gives the possibility to expand its capabilities allowing you to have a much more flexible CMS.
Through the Themes you can build sites with a high aesthetic level, which have an excellent performance for SEO, as we mentioned above, but often tend to accumulate on the dashboard, without giving them a subsequent use.
Besides being a problem for the stability of a website, both plugins and themes gradually take up space, both in the database and in the hosting itself, and what initially could be a web of 100 or 200 MB in size, can end up in 300 or 500 MB if the bad practice of installing, testing and not removing what is not needed is maintained over time.
Both Plugins and Themes removal should always be done from the CMS dashboard, and not manually deleting the files or folders from your Hosting Panel or via FTP.
WordPress Theme deletion process:
- Make a backup copy ALWAYS!
- Access the dashboard, Appearance, Themes.
- Disable the theme to delete if it is active by activating another theme by default.
- Click on Details of the Theme to delete.
- Click on the bottom right button “Delete”.
It is possible that for some reason your version of WordPress has been stuck in a branch that no longer receives maintenance updates, and possibly not even security updates. In these cases it is best to force the update so you can move from a “stagnant” or “ended” version to the current stable version. If you have not disabled automatic updates of the WordPress core, it should not be necessary to force a “version upgrade” and you will be using the stable version.
However, if not, check if in your wp-config.php file there is any “define” that prevents these updates, because if it appears it will be a sign that the updates will have to be done manually, i.e., on demand, and not automatically.
define( 'WP_AUTO_UPDATE_CORE', false );
In these cases it can be false or minor depending on the type of updates you are limiting.
define( 'AUTOMATIC_UPDATER_DISABLED', true );
The recommendation is that WordPress core updates are always MANUAL, supervised and prior backup, so you will avoid many surprises and unexpected 500 errors.
Plugins and themes as a general rule are not auto-updated, although you can.
It is clear that keeping the website updated is an important task, but equally or more important is to keep the plugins installed properly updated and always download them from reliable sites, as currently outdated plugins or with programming problems are responsible for 80% of WordPress vulnerabilities.
These two guides can help you, how to update WordPress and update WordPress manually.
FINAL REFLECTION
Conclusions
The implementation of a web project with WordPress is a fascinating adventure, in which each step is a learning experience and the result usually ends in success. Enjoy every moment, it is unique!

