How to install WordPress
Installation tutorial in English
How to install WordPress
Divided into several sections, this WordPress Installation Manual will allow you to install or uninstall WordPress with extreme ease, either by performing the installation manually or using an automatic installer of your Hosting.
The most important advantage of WordPress.org over WordPress.com is that you can use it for free on any Hosting (self-hosted) without the need to be tied to a specific hosting and with the peace of mind of having 100% control of the installation, subsequent customization and administration of your website, whether for a Blog, a corporate website or an online store.
Installing WordPress
There are basically two ways to install WordPress on a Hosting:
- Manual installation, step by step, performed by the user.
- Automatic installation, 90% unassisted, where the process rests on the installer.
We address separately these two methods of installing WordPress, also differentiating the installation on a main domain of Hosting, on a subdomain and on an additional domain, as they are the 3 most common cases that you can find.
There are many hosting services that offer WordPress installers to their customers to simplify the process.
OPTIMIZED CONFIGURATION FOR WORDPRESS
Evolving technology for hosting fast, secure and stable websites
- PHP 8.0, 7.4, 7.3, 7.2, 7.1 o 7.0
- PHP 5.6, 5.5, 5.4, 5.3 o 5.2 PHP HARDENED
- 1024MB RAM php por proceso.
- Servidor Apache + Nginx + Varnish Caché + HTTP/2 + TLS 1.3
- CageFS para aislar tu cuenta de Hosting.
- Ancho de banda garantizado 1 Gbps.
- Mod Security: Reglas personalizadas Anti-Hackeo para WordPress.
- Escaneo y eliminación de Malware.
- María DB con PhpMyAdmin, últimas versiones.
- SUPHP Habilitado.
- Zend Engine – Ioncube.
- GZip habilitado.
- Mod_rewrite: ON.
- File Uploads: ON.
- Register Globals: OFF.
- Rg_emulation: OFF.
- Soporte Zlib.
- Soporte XML.
- Session Save Path : Escribible.
- Curl habilitado.
- Magic Quotes: OFF.
- GD habilitado.
In the main folder of the Hosting
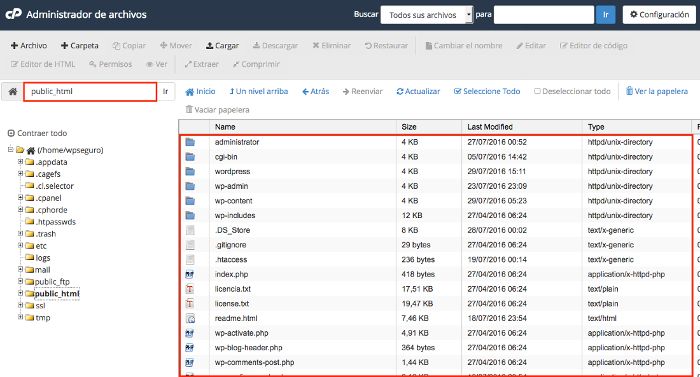
Most WordPress installations in a Hosting are done in the main folder, which in WePanel hosting is in the public_html folder, since this is the folder that hosts the contents that are displayed by the main domain of the Hosting account.
Installation process:
- Log in to your Hosting Panel (WePanel).
- Go to the Software/Services section, Webempresa Packs.
- Go to the top tab Applications Browser.
- Scroll down until you reach the Applications for Webempresa WordPress Pack section.
- Click on the installer icon of the desired Pack (1).
- In the selected Pack screen, click on the top button install this application.
- In the Domain field select your domain or the temporary url (without alias ‘www’).
- Leave the Path field ’empty’.
- In Settings take the opportunity to change the Admin Username.
- Incidentally if you want also the Name of the web site.
- Complete the process by clicking on the Install button at the bottom.
- Wait a few seconds for the installation process to complete (you will see a progress bar).
- Once the installation is finished you can click on the domain or temporary url to access the website.
Installing WordPress on a subdomain
To consider the use of subdomains you must first be clear that they always depend on a domain and that they are not individual elements, that is, without a domain you can not create a subdomain.
A subdomain will basically allow you to create independent content from the main domain, either by way of content categorization, separation of web languages or simply to have independent sites based on the same domain.
We could say that one of the biggest drawbacks of managing different websites under the same domain is the lack of mobility when you want to separate web projects managed in the same domain. Against that, the use of subdomains is a viable and economical option that you can use to install WordPress themed websites.
Advantages of working on a subdomain:
- They work as independent installations from the ones you manage with the domain.
- Its use is unlimited (understanding that you can have hundreds of subdomains under the same domain).
- It is an economic solution (zero cost).
- They are an alternative to the use of directories (folders) to host other websites (1)
- It does not generate its own ranking independent of the domain, although it subtracts strength to the main domain.
(1) A company with departments can use subdomains such as commercial.domain.com instead of domain.com/commercial.
From the WePanel Hosting Panel in the Domains section and within Subdomains, you can create the subdomains you need.
Before installing a website associated with the subdomain, you must first create the subdomain and then assign it to the WordPress Pack you are going to install.
When you create a subdomain, a folder is created in /public_html in which you can install the new website independent of the main one hosted in the main folder of the Hosting which is /public_html (or in another different folder).
To install WordPress on a previously created subdomain, from WePanel,access (in the case of a Webempresa Hosting) to Software/Services, Webempresa Packs.
Once inside go to the Application Browser tab, select the WordPress Pack you want to install, which will take you to the next installation screen where you click on the button + install this application.
The Path field is left blank because the subdomain already has the installation destination folder set at the time the subdomain was created.
Scroll down to the Configuration section to modify the Administrator Username (recommended) and if necessary the password (we recommend a strong alphanumeric password), and customize the name of the website in the Website Name field.
Once this is done, you can launch the installation of the WordPress Pack on the subdomain and wait for the process to complete.
Once the WordPress Pack installation is finished, to access WordPress you will have to invoke in the browser the url http://wordpress.dominio.com/ and for the dashboard the url http://wordpress.dominio.com/wp-admin (or the name you have given to the subdomain).
Installing WordPress on an additional domain
The difference of installing WordPress on an additional domain with respect to a subdomain basically lies in the selection of the domain that will host the installation in the corresponding folder, previously created, automatically, when adding a domain in WePanel as Additional Domain, the rest of the process is similar for automatic installation.
This video illustrates the automatic installation process in an Additional Domain.
step by step
How to install WordPress manually
- Download WordPress from the official WordPress.orgwebsite.
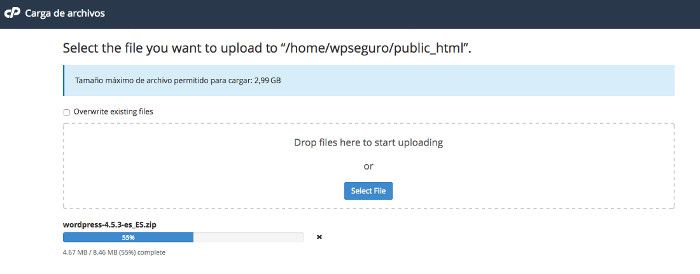
- Upload the .zip file to the folder of your desired Hosting.
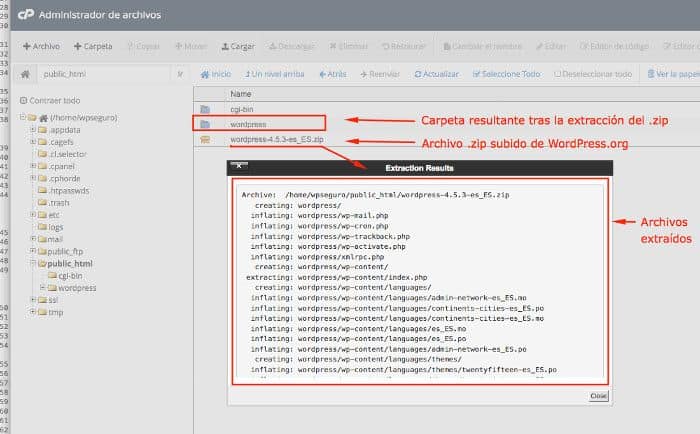
- Extract the content in the current folder (1)
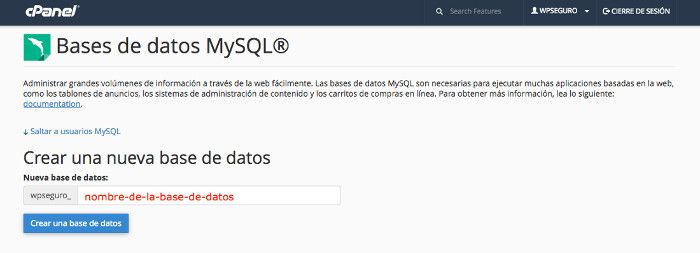
- Create a database from WePanel, Databases.
- Run the installer from your domain url or temporary url.
- Complete the installation and verify the operation.
(1) This will generate a folder called wordpress inside the main folder of the Hosting public_html.
The recommended thing is that before proceeding with the installation you analyze if it is in this folder where you want to have the web, if you want to rename it to use it later with a subdomain or additional domain or if you want to move the contents of this folder to the main folder of the Hosting.
Download from WordPress.org the latest stable version of this CMS, to your computer.
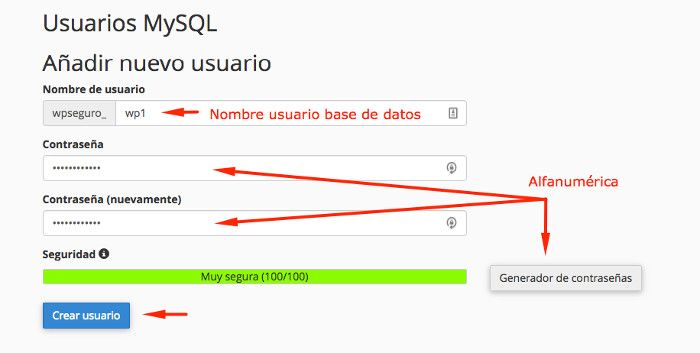
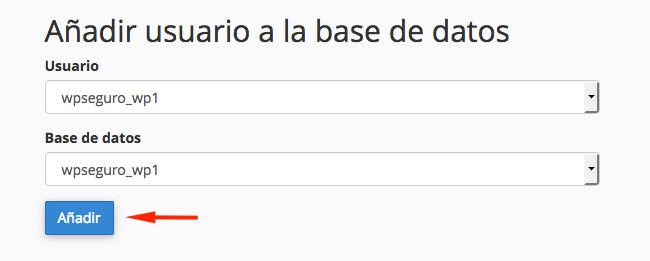
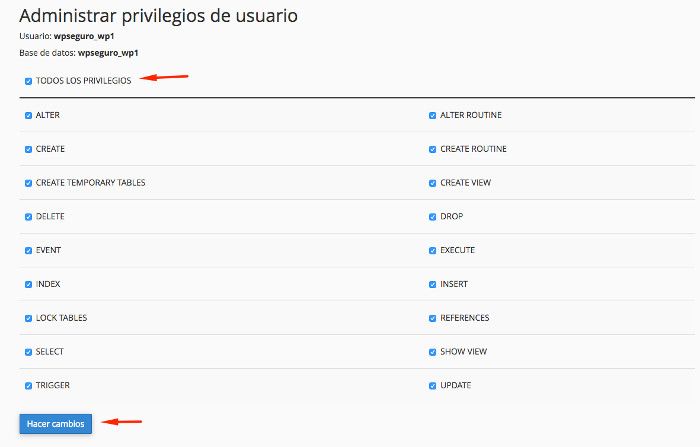
Now it’s time to create the database for this WordPress installation. Go to your Hosting Panel, Databases, Create a new WordPress database.
In that same screen, below, you must create the user that will have privileges to use that database and generate a secure password, preferably only alphanumeric (letters and numbers).
Then, from a new tab in your browser, open the url of your domain (or the temporary url if you do not yet have a domain assigned to your Hosting) and launch the WordPress installation (self-hosted).
Starting the installation
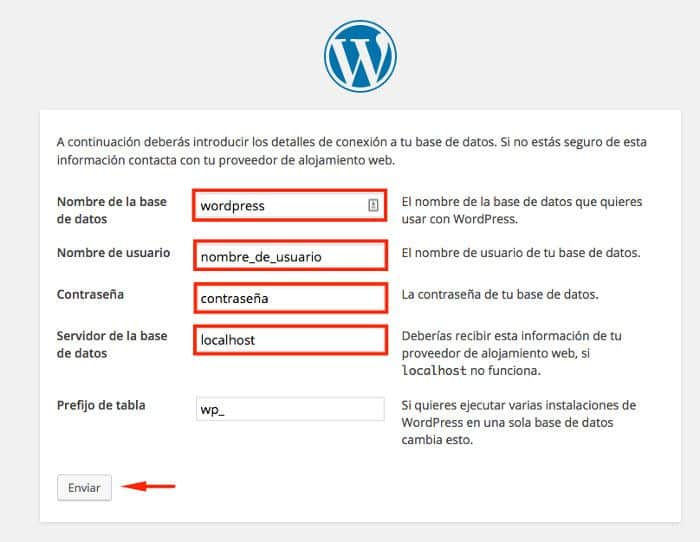
WordPress tells you, in the first step of the installer, the data you need to have at hand in order to complete the process successfully:
- Database name
- Database user
- Database password
- Database server
- Table prefix (if you want to run more than one WordPress on a single database)
The data regarding the database we had already collected minutes ago when we created one for this installation.
The Host of the database in Webempresa is always localhost, in other providers you will have to consult.
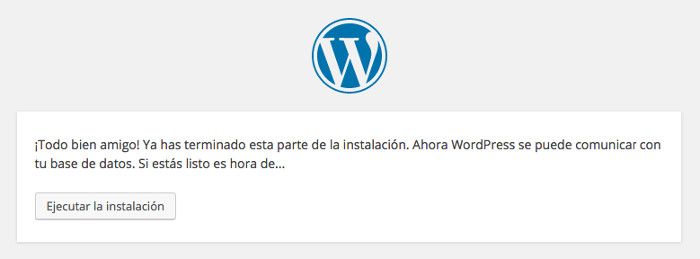
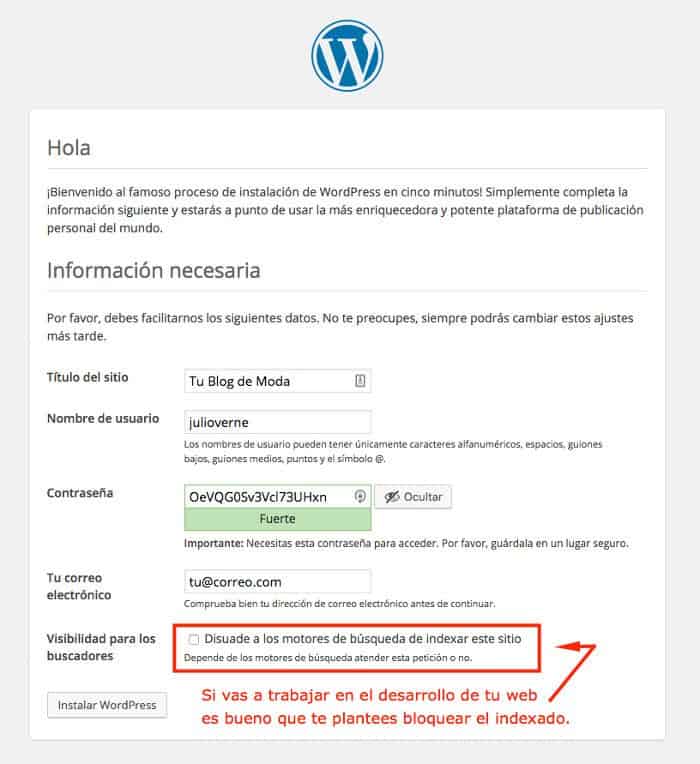
Now, with the database data you have previously created, fill in the fields of the second WordPress installation screen manually.
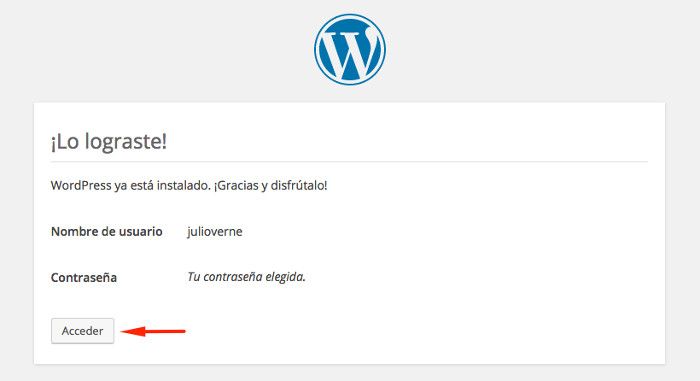
After going through this phase of the manual WordPress installation, you are ready to use the website.
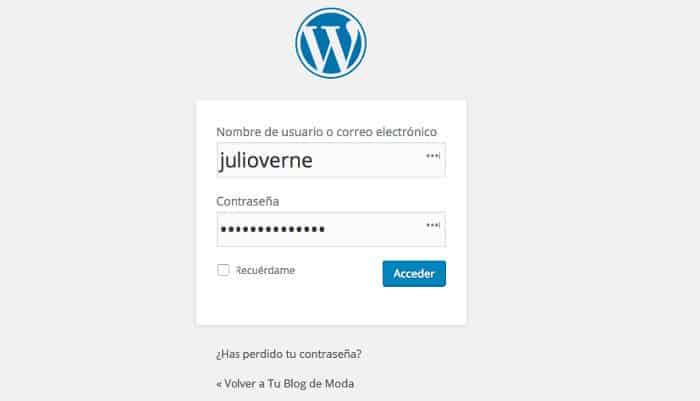
From the url of your domain.com/wordpress/wp-admin you will be able to access the dashboard of the installation.
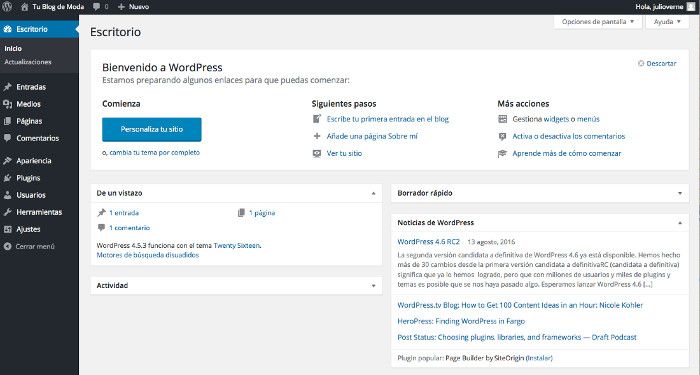
From here, inside the WordPress administration panel, the adventure of designing your website with WordPress begins.
Note Manual WordPress installations are not reflected in the WePanel Hosting Panel, so from the Software/Services, Packs, My Applications section, you will not see this installation available since this section only reflects the installations performed automatically.
Installing WordPress.org (self-hosted)
importing from WordPress.com
It is possible to install WordPress on a contracted Hosting using an installation from WordPress.com, Automattic’s free but limited hosting service.
This involves exporting the contents from WordPress.com, and importing them to a clean installation of WordPress.org (self-hosted) previously installed on your Hosting, using the XML format.
Exporting your blog content you have on WordPress.com using the default Export tool will generate an XML file with all the pages and posts of your blog. This file does not contain information about plugins, WordPress themes,, or general site configuration. The import task for these cases is manual.
What can you move from WordPress.com?
- Move posts, pages and custom posts.
- Move comments.
- Move custom fields and post meta.
- Move categories, tags, custom taxonomy terms.
- Move authors.
All other features, whether widgets, plugins or themes cannot be moved because WordPress.com does not allow it.
WordPress.com does not allow the installation of certain types of plugins and especially those relating to backups or backups so make a backup of your website on wordpress.com is impossible.
Keep in mind that WordPress.com is a closed platform and that the transfers are not like those of a normal WordPress self-hosted (org).
This video illustrates the WordPress installation process by importing content from WordPress.com.
Uninstalling WordPress
If you need to uninstall WordPress, either from the main folder of your Managed WordPress Hosting, usually /public_html, from an additional domain or a subdomain, you have to keep in mind a few things before proceeding to delete data from the Hosting that may then affect other websites (if you have several) or prevent you from restoring it in case of later need.
Any uninstallation in the Hosting Panel is always a somewhat delicate task, so taking the proper precautions by making a full WordPress backup of the Hosting ensures you have all the files, folders, databases, and other items hosted on WePanel, so that you can access them from the WordPress backup in case of need, especially if problems arise after the uninstallation of WordPress.
There are 2 common ways to remove a WordPress installation on a Hosting:
- Automatic uninstallation, 90% unassisted, from the Hosting.
- Manual uninstallation, deleting files and database.
Automatic uninstallation
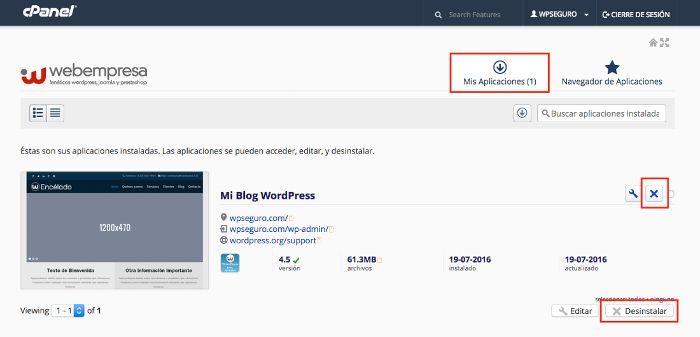
This is probably one of the easiest WordPress uninstallations to perform because it only requires accessing the installations section, in WePanel it would be Webempresa Packs, go to the My Applications section and select the WordPress installation to proceed to remove them from the uninstall option.
When you install a WordPress Pack from the pack installer of the WePanel Hosting panel, if later for some reason you need to uninstall the pack, it is not recommended that you delete the folder directly from the File Manager, but do it from the pack uninstaller itself available in WePanel.
Uninstallation process:
- Log in to your Hosting Panel (WePanel).
- Go to the Software/Services section, Webempresa Packs.
- Go to the top tab My Applications.
- If you have several, locate the one you want to remove.
- In the pack to uninstall/remove you will see a blue X button.
- Click on the X icon to uninstall the pack (2).
- Then click on the Uninstall button.
- When the process is complete the pack information disappears from the My Applications screen.
- You have successfully uninstalled the WordPress Pack.
Notes
(1) It is possible that your active icons are different from the ones you see in the video, as it depends on the type of WordPress product you have contracted.
(2) When you uninstall a Pack by this method it removes the database of this pack and the native files of the pack, but if you generated content after installing the pack, for example you uploaded images to the media library, etc., then it is possible that some files or folders remain and you have to delete them manually from the File Manager.
In the following video we show you how to uninstall a WordPress Pack from the pack installer of the WePanel Hosting Panel.
Manual uninstallation
The manual uninstallation of WordPress applies to cases in which the installation was previously also performed manually or was the result of a transfer of a website from another Hosting, which means that this installation possibly lacks automatic uninstaller in the Hosting Panel, Software, Packs, My Applications
This type of uninstallation performs the following process:
- Make a full backup of the Hosting and download it to the computer (for security).
- Access the folder of the installation to be removed and edit the wp-config.php file
- Write down the name of the database and the database user of the installation to be deleted.
- From WePanel go to Databases, MySQL Databases.
- Delete the affected database user.
- Delete the affected database.
- Go to WePanel, Files, File Manager.
- Select and delete the affected WordPress installation folder.
In this video you can see the process of manually uninstalling a WordPress installation on a WePanel based Hosting.
Conclusions
There are several ways to install WordPress on a Hosting (self-hosted) so choosing the right one is more a function of the specific needs of your web project and the knowledge of the medium you have..
However any of the installation process is extremely simple once you observe the steps explained in the different sections of this WordPress installation manual.
There are other installation methods such as using FTP to upload an extracted installation to the Hosting and then from the hosting management panel create the database and complete the installation process via browser, but it is not explained in this tutorial because it is considered a more laborious process for users who are new to the use of WordPress to develop their web projects on the Internet.

